Monthly Archives: May 2011

How to Create a Custom JSF Validator

Environment (JDeveloper 11.1.1.5.0, ADF BC, ADF Faces, hr schema)

ADF Faces provides several validation types; UI component attributes validation, default ADF Faces validators, and custom ADF Faces validators. The last type (custom ADF Faces validators) enables you to create your own validation logic in a Java class then you can use it as a validator to your UI component. The custom validator can be created for a specific component in a single page, or can be created to be used in all pages in your application. In this example, I will explain how to build your own custom validator that can be used in all pages. This example based on hr schema, mainly on Employees table, and assumed that you already have built your BC. Our business rule is that the PHONE_NUMBER attribute should be at least 9 digits. The steps to build your own validator are:

  1. Create a Java class that implements the javax.faces.validator.Validator
    interface in your viewController project as shown below. In the name field enter “PhoneValidator”, enter your desired package, and in the Optional Attributes section click the green plus symbol to add the interface that this class should implement.

    PhoneValidator class

  2. After you have created the class, you will see the validate method to implement the interface. override this method as shown below.
    public void validate(FacesContext facesContext,
    UIComponent uIComponent,
    Object object)
    throws ValidatorException {
    //add your validation logic here
    String phone = object.toString();
    if (phone.length() < 9) {
    FacesMessage fm =
    new FacesMessage(“Phone number should be at least 9 digits”);
    throw new ValidatorException(fm);
    }
    }
  3. Now you need to register your validator in faces-config.xmlfile, locate this file in your viewController project then double click on it, after the file was opened in your main window click the overview tab, then select the validator link from the left hand side. Click on the green plus symbol to add your validator as shown below.

    register the Phonevalidator

  4. Now our validator is ready to use, create a page, drag and drop the EmployeeView1 from the data control, and select ADF form from the menu.
  5. Right click on the PhoneNumbe filed, and select insert inside Input Text → JSF Core → Validator. Once you add the validator, go to the property inspector palette, select the ValidatorId property then select our PhoneValidator from the list. your page source should look like this source snapshot.
    <af:inputText value=”#{bindings.PhoneNumber.inputValue}”
    label=”#{bindings.PhoneNumber.hints.label}”
    required=”#{bindings.PhoneNumber.hints.mandatory}”
    columns=”#{bindings.PhoneNumber.hints.displayWidth}”
    shortDesc=”#{bindings.PhoneNumber.hints.tooltip}”
    id=”it4″>
    <f:validator binding=”#{bindings.PhoneNumber.validator}”/>
    <f:validator validatorId=”phonevalidator”/>
    </af:inputText>
  6. Run your page and enter a phone number less than 9 digits, submit the form, the error message will be shown as below.

    error message shown after violate PhoneValidator

see also: Add business rule in the setter method of an entity attribute

9 Comments

Filed under ADF

Add business rule in the setter method of an entity attribute

Environment (JDeveloper 11.1.1.5.0, ADF BC, hr schema)

Most of us know how we can add a validation rule using methodValidator on an attribute. However, this is not the only way that we can add a business rule for an attribute, we can add our business rule in the setter method for that attribute.

In this post I will explain how to add business rule in the setter method of an attribute and describe the difference if we add a business rule using methodValidator. This example based on hr schema, mainly on Employees table, and supposed that you already have built your BC. Our business rule is that the PHONE_NUMBER column should be at least 9 digits.

First Part.

The first part of this example is to add a business rule using  validatePhoneNumber method as shown below.

/**
     * Validation method for PhoneNumber.
     */
public boolean validatePhoneNumber(String phonenumber) {
        if (phonenumber.length() < 9)
            return false;
        else
            return true;
    }

What happen when we run our application?

when we run the application and set the phone number field, the following steps take place:

  1. the view object layer calls setAttribute(“PhoneNumber”,”123456789″) method.
  2. setAttribute(“PhoneNumber”,”123456789″) method calls setPhoneNumber(String value) method in our EmployeesEntityImpl class.
  3. setPhoneNumber(String value) calls setAttributeInternal(PHONENUMBER, value) where PHONENUMBER is an integer to identify PhoneNumber attribute.
  4. setAttributeInternal(PHONENUMBER, value) method calls validatePhoneNumber(String phonenumber) method.
  5. if validatePhoneNumber(String phonenumber) method returns true, then PhoneNumber attribute is set with the passed value.

As we can see that at some point during the execution setPhoneNumber(String value) method calls setAttributeInternal(PHONENUMBER, value) which in turns calls the validatePhoneNumber(String phonenumber) method. The difference between setAttributeInternal(PHONENUMBER, value) and setAttribute(“PhoneNumber”,”123456789″) methods is that setAttribute(“PhoneNumber”,”123456789″) invokes the set method for this attribute in a subclass of this Entity Object (if a subclass is generated). The set method name is derived from the attribute name: for example, the method setPhoneNumber pertains to an attribute named “PhoneNumber”.But setAttributeInternal(PHONENUMBER, value) validates and sets the value of an attribute by index, it sets an attribute value after validating the value against declarative-validators set for that attribute.

Second Part.

In this part we will add our business rule to the attribute’s setter method as shown below:

/**
     * If you write validation code in a setter method,
     * you have to throw an exception yourself
     */  

public void setPhoneNumber(String value) throws oracle.jbo.JboException {
        if (value.length() >= 9)
            setAttributeInternal(PHONENUMBER, value);
        else
            throw new oracle.jbo.JboException(“Phone number should be at least 9 digits”);
    }

What happen when we run our application?

The setter method just described implements exactly the same business rule as the validatePhoneNumber method. When we run the application and set the phone number field, the following steps take place:

  1. the view object layer calls setAttribute(“PhoneNumber”,”123456789″) method.
  2. setAttribute(“PhoneNumber”,”123456789″) method calls setPhoneNumber(String value) method in our EmployeesEntityImpl class.
  3. now the business rule is checked in the setter method, if passed then it calls setAttributeInternal(PHONENUMBER, value) method, otherwise it throws the exception and notifies the user with business rule violation.

So, what are the differences between methodValidator business rule and business rule validation inside the setter method.

  1. methodValidator are called during the validation rule stage (i.e. at some point during the execution of setAttributeInternal method). On the other hand, business rule inside the setter may or may not call setAttributeInternal method.
  2. use setter validation If you want your business rule validation comes before other validations. But if you want it to come after some validations rules use a methodValidator.
  3. methodValidator can be used for several attributes, as an example the previously mentioned validatePhoneNumber method can be used for WorkPhone and HomePhone attributes.

see also: How to Create a Custom JSF Validator


3 Comments

Filed under ADF

How to Implement many to many association

Environment (JDeveloper 11.1.1.5.0, ADF BC, hr schema)

Many to many relationship can’t be represented in the physical database (i.e. in the actual database table) because you can’t just associate one key from one table with another key from the other table.  However, many to many relationship can be broken down into a series of two or more of one to many relationships through a table called intersection table. Intersection table is simply a table that contains the primary key of each of the table being connected. Consider the followoing cases as examples about many to many relationships:

  1. A student can take many different courses, and each course can be taken from many different students.
  2. An employee can change his job several times during his career life, and each job can be held by several employees.

In this example I will explain how to implement a many to many association based on hr schema. As mentioned above, each employee can have different jobs at different time interval and each job can be held by several employees . To implement this, I will assume that you have already built your BC, we need (Entity objects, View objects) for these database tables:EMPLOYEES, JOBS, JOBS_HISTORY. The steps to implement many to many association are:

  1. from the right click menu of your entities package node, select New Association.
  2. for the association name, enter EmployeePastJobsAssoc and click next.
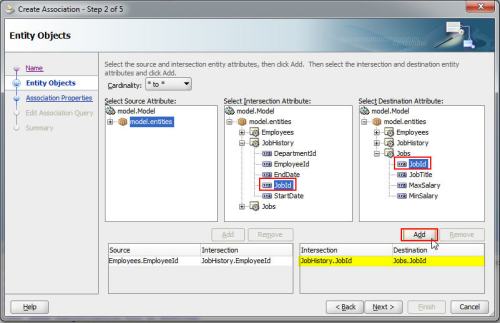
  3. in the Entity object window, select * to * as the cardinality of the association. And from the Select Source Attribute area, expand the Employees entity and select EmployeeId attribute. From the Select Intersection Attribute area, expand the JobHistory entity and select the EmployeeId attribute then press the Add button as shown below.

    create EmployeePastJobsAssoc association

  4. from the Select Destination Attribute area, expand the Jobs entity object, then select the JobId attribute. From the Select Intersection Attribute, expand JobHistory entity and select the JobId attribute then press the add button as shown below, then click the Next button.create EmployeePastJobsAssoc association
  5. click Next for other windows, you can accept the default configuration. Then click Finish button.
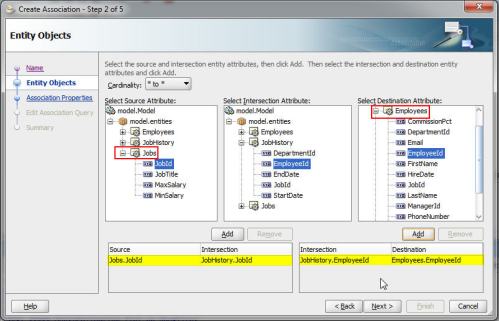
  6. repeat the steps from 1-5 to create JobHoldersAssoc, but make sure to select the JobId from the Jobs entity from the Select Source Attribute area with the JobId from the JobHistory entity in the Select Intersection Attribute area. And select the EmployeeId from the Employees entity in the Select Destination Attribute with the EmployeeId from JobHistory entity in the Select Intersection Attribute area as shown below.

    create JobHoldersAssoc association

  7. right click on your view package node and select New View Link from the menu. you must see the Create View Link window.
  8. on the name window enter EmployeePastJobsLink in the name field and click next.
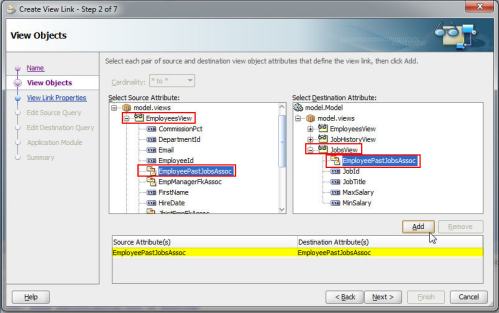
  9. in the View Object window, select * to * as the cardinality of the view link. In Select Source Attribute area, expand the EmployeesView node and select the EmployeePastJobsAssoc node. In Select destination Attribute area, expand the JobsView node and select EmployeePastJobsAssoc node then press the Add button as shown below. Click the Next button.

    create EmployeePastJobsLink view link

  10. in View Link Property window accept the default and click the Finish button.
  11. repeat the steps 7-10 to create JobHoldersLink association. Make sure to select the JobHoldersAssoc  from JobsView in the Select Source Attribute area. And select JobHoldersAssoc  from EmployeesView in the Select Destination Attribute area as shown below.

    create JobHoldersLink view link

  12. now open your Application Module, then open the Data Model section. shuttle EmployeesView and JobsView via EmployeePastJobLink to the Data Model area. And shuttle the JobsView and EmployeesView via JobHoldersLink to the data Model area as shown below.

    Add the views to Data Model

  13. select Run from the right click menu on your Application Module.
  14. double click on EmployeePastJobsLink1 to see the employee and his/her past jobs as shown below.

    Employees and his/her past jobs

  15. double click on JobHoldersLink1 to see the Job and its employees’ holders as shown below.

    Jobs and holders


Leave a comment

Filed under ADF

Invoke button’s action programatically in JSF using Java

Environment (JDeveloper 11.1.1.5.0,  ADF Faces)

Sometimes developers may want to invoke button’s action programatically without needing a user to click a button, a common use case for this scenario is implementing navigation propgramatically using Java, in this case the developer may drag and drop a button in the page and binds its action property to some static action outcome or to a method that returns a String, and set Visible property for the button to false. At some point the developer can invoke this button’s action by using this code.

FacesContext facesContext = FacesContext.getCurrentInstance();
UIViewRoot root = facesContext.getViewRoot();
//cb1 is the fully qualified name of the button
RichCommandButton button = (RichCommandButton) root.findComponent(“cb1”);
ActionEvent actionEvent = new ActionEvent(button);
actionEvent.queue();


3 Comments

Filed under ADF

Recover deleted rows without using rollback

Environment (JDeveloper 11.1.1.5.0, ADF BC and ADF Faces)

In many cases developers want to cancel an edit form without using rollback action. Frank Nimphius has implemented this functionality using Java  in this example   006.  How to cancel an edit form, undoing changes in Java. However, this method falls a bit short when a record was deleted and now needs to be recovered. In this example I will explain how to  recover  the deleted rows without using rollback.

In my case I have a table called TEST in my database schema, and I have already created BC (Entity object, View object, Application module). The steps to implement this use case are:

  1. generate the TestImpl class for our TEST entity.
  2. override the remove method in  TestImpl class as shown below:    
    public void remove() {

            refresh(REFRESH_WITH_DB_FORGET_CHANGES);
            super.remove();
        }
  3. generate TestViewImpl  class.
  4. add this method to TestViewImpl class.    
    public void undoDelete(){
    Iterator iterator =
    getEntityDef(0).getAllEntityInstancesIterator(getDBTransaction());
    while (iterator.hasNext()) {
    TestImpl test = (TestImpl)iterator.next();
    if (test.getEntityState() == test.STATUS_DELETED) {
    test.revert();
    }
    }
    executeQuery();
    }
  5. add undoDelete() method to view object client interface, as shown in figure below. The client interface contains the methods from view object class that are available for clients using this object.

    Add client interface

  6. create a page and drag and drop the TestView1 from the data control as ADF table in the page.
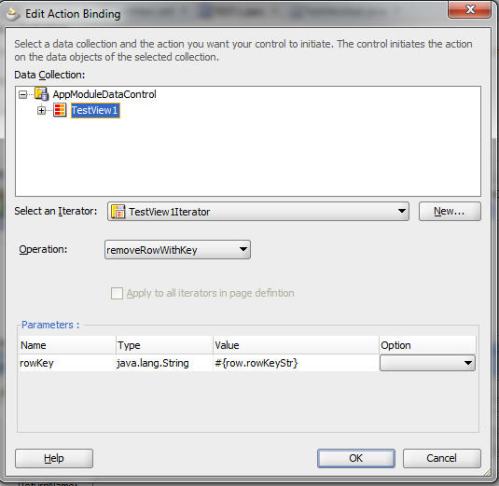
  7. add an extra column to the table, then go to the data control, expand TestView1, expand the operation folder, drag and drop removeRowWithKey operation into the newly created column, set the parameter for removeRowWithKey operation to this expression value #{row.rowKeyStr} as shown below.

    removeRowWithKey action

  8. again from the data control, expand TestView1, you should see undoDelete() method as shown below, drag and drop it in the page as a button or a link.

    undoDelete() method

  9. run the page and enjoy with testing.


8 Comments

Filed under ADF

Internationalize LOV using switcher

Environment (JDeveloper 11.1.1.3.0, ADF BC)

Everybody knows how to internationalize his application at run time, for those who don’t know how to do this, they can check this document. However this can be done for labels, headers text,static LOV,…etc. The question is how can we internationalize model driven LOV or dynamic LOV, this example will explain one method to do this.

Use Case: our application supports two locales Arabic (ar) and English (en), and the user has the flexibility to change his locale at run time. In our application we have a registration form page which has a Bank attribute, this form based on RegDetails view, the Bank attribute will be populated from model drivel LOV, the lookup view that populate the Bank field has this structure in database.

CREATE TABLE BANKS
( id     number(10),
arabic_name    varchar2(50),
english_name varchar2(50) ,
CONSTRAINT bank_pk PRIMARY KEY (id)
);

So when the user select Arabic locale at run time, arabic_name filed should be the display value in the Bank attribute in our form, and when the user change to English locale, english_name filed should be the display value in the Bank attribute in our form.

How to implement this use case:

Fortunately ADF BC allows us to define more than one LOV for a single attribute, and switch between them as your case need. The following steps show how can we implement this, supposed that our BC has been created in advance:

  1. Open RegDetails entity object, to add a transient attribute called userLocale. This attribute will hold two values ar (for Arabic loacle) and en (for English locale), and this attribute is set at run time.
  2. Open RegDetails view object, and add the previous attribute to your view object.
  3. Now we need to define Bank LOV, open RegDetails view, then expand the attributes and select the Bank attribute.  once you select the Bank attribute you will see List of values: Bank section, click the green plus sign to add a new LOV. The Create list of value window will be shown on your screen.
  4. Give a meaningful name for your LOV, select your data source or add a new one if you don’t have, select your List attribute as shown below.

    LOV arabic bank name

  5. In the same window, click the UI Hints tab, and from the available area select ArabicName and shuttle it the to selected area as show below.Press OK to close the window.

    LOV arabic bank name

  6. Repeat steps 3-5, to create another LOV, give it en_LOV_Bank name, and in step 5 select EnglishName instead of ArabicName as the display value.
  7. In RegDetails view add a new transient attribute BankLovSwitcher, The value of this attribute should contain the LOVs name which are created in the previous steps.
  8. Select your BankLovSwitcher attribute, and click edit (pencil symbol) to open Edit Attribute: BankLovSwitcher window. In the Value Typefield select expression radio button, and in the value field click the edit button as shown below.

    BankLOVSwitcher attribute

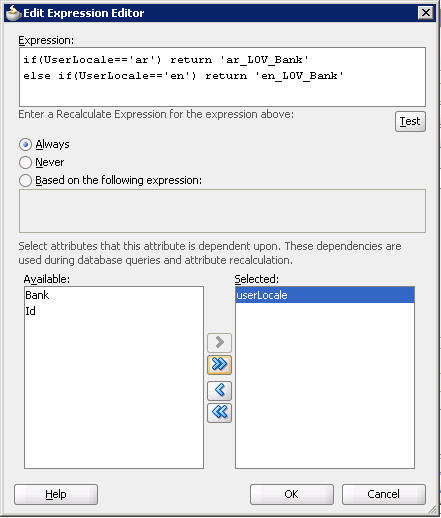
  9. After you click the edit button, the Edit Expression builder window will be shown, enter the following expression
    if(UserLocale==’ar’) return ‘ar_LOV_Bank’
    else if(UserLocale==’en’) return ‘en_LOV_Bank’
    and in the available area select the the UserLocale attribute and shuttle it to the selected area as shown below, then press OK.

    BankLovSwitcher attribute value and dependency

  10. Now, select your Bank attribute, in the List of Values: Bank section, and from the List of Values Switcherlist select BankLOVSwitcher attribute. and select your default LOV as shown below.

    LOV switcher

  11. Now, all you need in your application is to add a simple method, this method should set the UserLocale attribute to ar when the user select or click the Arabic locale and set it to en when the user change to English locale.


9 Comments

Filed under ADF

Refresh part of the page periodically using poll component

Environment (JDeveloper 11.1.1.3.0, ADF BC, HR schema)

This example shows how we can use af:poll component to refresh part of the user interface (UI) in our page periodically. The poll component delivers PollEvents to the server at fixed intervals. This can be used either for steady updates (i.e.  check if  your data base has been changed by other users and reflect these changes on your page ), or to deliver a heartbeat to keep a user logged in.  Poll component is useful for dashboard type applications where the use are interesting in periodic updates of the graph in the page.

This example is based on employees table in HR schema, where we want to display the employees table in our page as a read only table, and the table will be refreshed periodically to reflect the data base changes without any user interference. The steps to do this are:

  1. Build you business component from HR schema, you need to have Employees view object either read only view object or based on entity object, and an application module containing an instance from previously mentioned view object.
  2. Create your page, then drag and drop EmployeesView from your data control as a read only table. here you can keep the columns you need and delete those that you don’t need.
  3. From the component palette, choose ADF Faces, then open Operation section and choose poll component as shown in figure below. drag the component on any place in your page.

    Drag and drop af:poll component

  4. To refresh our table we need to re execute our query, to do this firstly we need to go to the page definition of our page, from the binding section click the green + sign as shown in figure below.

    add action binding

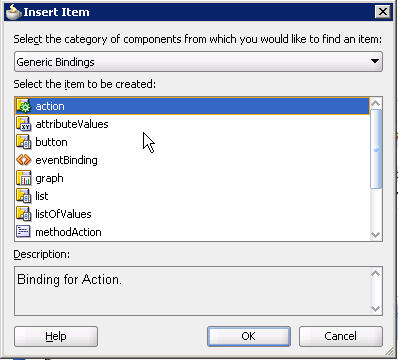
    Then select the actionitem and press OK as shown below

    select action item

    After that select your view instance and from the operation select list choose execute and press OK as shown below.

    add execute action binding

  5. From the structure window select the poll component, and from the property inspector change the Interval value as you need. this value is in millisecond and used to raise poll events when our time interval elapsed, once our time period elapsed it recalculates for another time interval and so on. The default is 5000, if the value is set to less than zero, polling will be disabled. In our example we will keep the default value.

  6. Again from the structure window select the poll component, and from the property inspector select PollListenerto add a method binding in your backing been. This method is executed at the end of our previously configured time interval. In this method we need to re execute our query as shown in the method below:
    public void refreshEmployeestable(PollEvent pollEvent)    {
            // Add event code here…
            BindingContainer bindings =   BindingContext.getCurrent().getCurrentBindingsEntry();
            OperationBinding operationBinding = bindings.getOperationBinding(“Execute”);
            Object result = operationBinding.execute();
        }
  7. Finally we need to set the partial trigger for our table to the ID value of our poll component. To do this, select your table and from the property inspector choose the partial trigger property, click the small down arrow near the input text of the partial trigger property and choose edit to open the Edit property: partial trigger window as shown below.

    Add partial trigger to employees table

  8. Select your Poll component from the available window and shuttle it to the selected window and press OK.
  9. Run your page. Try to modify some records in your table by writing simple SQL update statement and commit the changes, you will see that your table in your page is periodically refresh itself without any user interference every 5 seconds.

2 Comments

Filed under ADF